
 1. First off, take this texture. It will be your base image, so better take it.
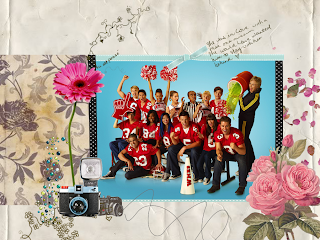
3. Take this blue ribbon/bow and paste it on top of the image (remember to resize it and sharpen). Then take this blue ribbon and place it on the bottom part of the picture.
4. Create a new layer and take this texture, after resize it, sharpen etc and then paste it on your base image (on the side of the picture) and flip it vertically. In Photoshop I believe it's Edit-Transform-cw 90 degrees. After you paste it, use the rectangle tool and select the unwanted ribbon past and then in order to delete it, press 'del' button on your keyboard or simply erase it with the eraser tool.
5. Again, create a new layer and then take this floral paper texture; resize, sharpen, etc and paste it on the base image. once again, take the rectangle select tool and delete the unnecessary parts. Then, take this flower and sharpen it and paste it on the left side of the picture overlapping the brown and blue ribbon.
6. Then take this camera; resize, sharpen, and then paste it on your base image. After that, rotate and re-sharpen once again and place it on the left corner of your picture. Then, take this small camera[sharpen if you desire; i did though] and place it below the big camera by dragging the big camera layer over the small camera layer.
7. Then take this little pearl like texture and place it underneath big camera and small camera by dragging the layers over it. after you paste it, erase the little dotty pearls you think are kinda left over. Then add this flower texture; resize, sharpen etc and paste it on the right corner of the picture.
8. Take this brush; sharpen and paste it below big camera and small camera by dragging the layers over it as stated above. Then take this other brush and paste it below the picture, erase the part of the brush the overlaps the picture.
9. Go back to your orginal picture;resize, desaturate; sharpen then make a new layer on your base image and paste the small desaturated one on top of the colored picture, then take the eraser tool and erase around it and make it blend in with the big colored picture, somewhat.
10. Take this brush; sharpen it and paste it on top of the blue laced ribbon at the top; overlapping both the lace and the picture. Then take this other brush and paste it on the right side of the top ribbon overlapping both the lace and the picture a little bit, and dont forget to sharpen!
11. Take this flower petals and set them to darken 100% and paste them on the right side at hte very top overlapping the text brush and the blue lace at the top, erase the unnecessary petals if desired.
12. Now's the time to add text! Add the text you want, wherever you want on the picture. Whatever font you choose, it's up to you!
13. I added this little brush on the top, remember to sharpen it for better results.
14. Done!
My result:
Could you do one Kesha for me?
ReplyDelete